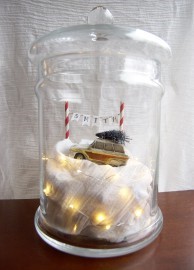
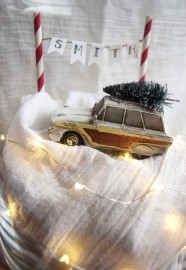
Looking for a terrarium idea for the winter months? If you’ve ever wanted to climb into a snow globe, today’s project is for you. Whether you’re looking for something new to display on your own mantle or want a unique gift for a friend, this large-scale winter wonderland terrarium idea is a special way to honor the season.
The great thing about this is that you can customize it for the person (or family) you’ll be giving it to. Add whatever you think they’d like best for decoration and top it off with a banner that spells out their family name. You can create it with a particular holiday in mind or swap out the Christmas tree for a snowman or sled, making it relevant for the whole season. Read on to find out how we made this one (spoiler alert: it started with a trip to your local Goodwill!)
Winter Terrarium Idea
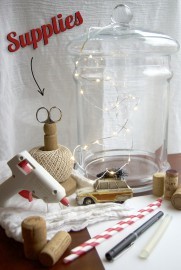
Supplies:
- Large piece of glassware
- White cloth for snow (We used a thrifted gauzy kitchen towel so you can see the glow of the lights through it, but you can also use a cable-knit scarf.)
- Filler to go under the fabric (We used corks.)
- 1 piece of cardstock
- LED string lights (we used two small strings. Make sure they don’t produce much heat since they’ll be touching fabric. You need to be careful not to create a fire hazard.)
- Twine or yarn
- Scissors
- Hot glue
- Hot glue gun
- Pen
- Pencil
- 2 paper straws
- Small ornaments (Scout the knick-knack and holiday sections of your Goodwill. Keep a lookout for trees, deer, and outdoor activities.)
- You could also add birch branches or pinecones foraged from outside!

Step 1: Snip a slice about an inch long into both of your straws. Measure a piece of twine out that is a little bit longer than what you need to spell out the name of the person (or family) you’re making the gift for. Knot it on both ends. Slip the knot into each straw and slide the twine down to the bottom of the cut sections.

Step 2: Cut the paper for your banner. You’ll need one piece for each letter of the name. These paper rectangles were each about 1 ½ inches x ½ inch. Before you cut them all out, draw a long line in pencil near the bottom of the area in which you are cutting. This creates a guide so that each notch you cut into the pennants comes out about even.
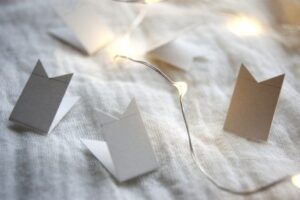
Step 3: Fold each rectangle in half then cut a V shape through both layers using the pencil line as a guide. When you’re done with that, erase the pencil or just write your letters on the opposite side.
Step 4: Fold each letter around the twine so you can get the spacing correct. When it looks right to you, add a dab of hot glue inside the paper right where it rests on the twine. Quickly pinch it closed.
Step 5: Dab a dot of glue to the bottom of one straw and stick it to the bottom inside the jar.
You’ll want to place it right up against the wall, so you have more space to decorate in front of it. Do the same to glue the second straw in place.
Step 6: Now add the snow! You could use traditional fake snow, but we liked the idea of fabric much better for a lot of reasons. The texture is much more fun; you can easily drape it over twinkle lights and with corks supporting it, the snow will be firmer and easier to rest heavy ornaments on top of. To get the snow arranged just right, flip the lid of the jar over (you could also use a bowl) and drape the cloth over it. We took one string of LED lights, turned it on and spread it out on top of the fabric with the on/off switch hanging out. Then you can begin to pile in the corks, wrapping the rest of the lights around the outside of them.
Step 7: Fold the fabric on top of the cork into a bundle, but keep the light switch accessible outside of the bundle. Turn the whole thing over and carefully nestle it into your jar, placing the light switch in the back right under the banner so you can easily find it.
Step 8: Turn on your second light string and place the control switch with the first one. Reach down into the jar to wrap the rest of the string lights around your snowy hill. Shift the corks into place as necessary to get a look you like. When everything is set, decide where you’ll add your ornaments. When the placement looks good, dab in a little hot glue where you need to and stick everything in place!
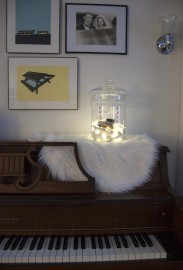
Another great thing about this faux terrarium is that it can’t die! Giving a gift that the giftee has to care for can be tricky. Those of us with black thumbs hate killing plants, but we hate killing plants that were thoughtfully picked out for us as a gift even more! This little winter wonderland has faux snow and a pretend evergreen, so it’s impossible to kill! If you’re eager for more greenery, add in some evergreen sprigs from your own Christmas tree or place a boxwood wreath around the base. We can imagine the terrarium being set up as a beautiful holiday dinner centerpiece!
It’s the season of giving, so you can be excited that this project allows you to give twice over. First, it’s a personalized gift for a special family. Second, if you purchased the supplies at Goodwill, it’s also a way for you to give back to your community. People who have participated in Goodwill organizations’ career services (made possible by dollars spent in Goodwill stores) have gone on to work with competitive employers, including the Internal Revenue Service, General Electric, General Motors, SC Johnson, Whirlpool, and the U.S. Army, Air Force, Navy and Marines. Happiest holidays to you and yours!