I love decorating my home but I especially love switching things out and decorating seasonally. One simple way to do that is with a wreath. You can completely transform your front door by switching out wreaths for each season, especially if you are like me and do not have a big porch to decorate.
While wreaths are small, they can be expensive. Even at the big box stores you can easily pay a minimum of $50 for a nice wreath. An easy way to cut down the cost and make something custom for you or a friend is to make a wreath with thrifted items. I also love to gift wreaths around the holidays to friends and family and this is so inexpensive and fun to do!
Here are some steps to find the supplies you need to DIY a wreath for each season. Please keep in mind that the thrill of thrifting is finding those treasures. Give yourself some time and a few visits as you may not find everything on the first visit to the thrift store. For the Fall wreath that I made, I got lucky and found everything in one visit, but you may not, so if you are giving this as a gift, go to a few thrift stores or go a few times that week to make sure you can complete your project on time.
An Inspiration Picture
To start you need an idea and my favorite way to start my DIY wreath is to find inspiration pictures. I like to search online for ideas from high end home decor stores or the big box stores and have that on my phone to look at as I thrift to find items that are similar to put together on the base of the wreath. For the Fall Wreath that I made for this post, I found a picture I loved off of Pottery Barn’s Website and knew I could make that $150 wreath for under $10 (and I did)!
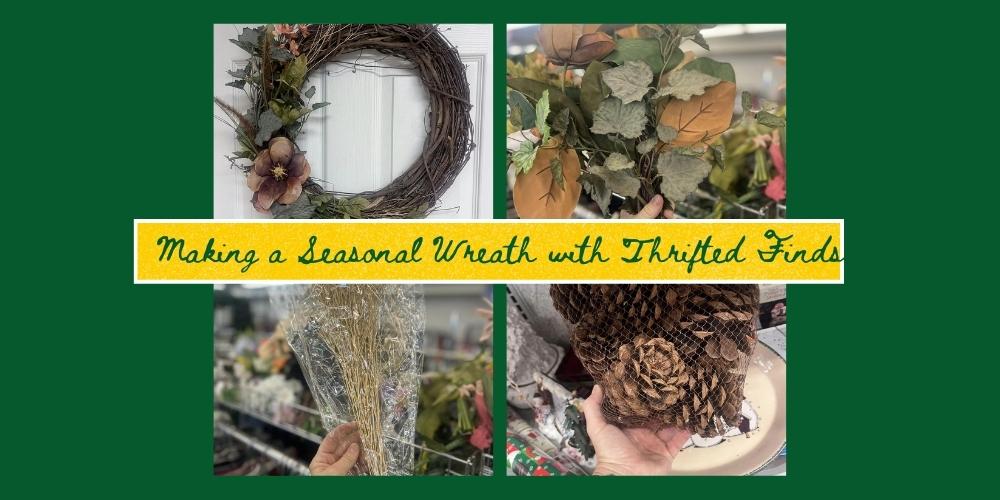
A Base
99% of the time when you walk into a thrift store you can easily find a plain grapevine wreath, a faux pine wreath or a wreath with greenery that needs a little TLC. These usually run from about $1-$5 per piece. I have also used a quilting ring, metal ring or hanging basket as the base of my wreath. For my Fall wreath I knew I wanted a grapevine wreath, and these are so easy to add things to as you just weave the stems into the grapevine. As soon as I went over to the home section, I found a plain grapevine wreath for $1.50!

Finding Fillers to Add To Your Wreath
This is the fun part! I love to search in the faux flower section to find what I need. I saw that they had a ton of faux flowers that day and had a wide variety of single stems, groups of faux flowers and greenery and some in packs that were never used. I looked at my inspo picture and looked for anything that had some green, oranges, pinks or fall colors. I quickly found a single brown magnolia flower that I knew would be pretty as the centerpiece. I also found some gold wooden twigs that were new in bag, some faux cattails, and some magnolia leaves. While it did not look 100% like the wreath in my inspo picture, all the greenery and flowers were beautiful, and I could still make it look the same way just with different flowers. I went to pay and they bunched some of the flowers together since I had so many single stems and I paid $5 for everything!
If you were making a Winter or holiday wreath, you could look for pinecones, ornaments, eucalyptus, ribbon, lights, cotton stems, cranberry picks, and you could even buy spray flocking to make your wreath look snowy.
For a spring or summer wreath you could look for faux fruit, brightly colored flowers, lavender, ribbons, baby’s breath, or some Easter eggs for an Easter wreath.
Sometimes, shopping off season for these filler pieces is easier than in season and you can make it ahead of time or keep all of your supplies until you want to make it.

Putting it together
This is the fun part! I like to have wire cutters, floral tape, floral wire and hot glue on hand just in case I need to secure items onto the base. You can find packs of floral wire or floral tape at your local dollar store. I take inventory of what I have and what I want to break down. I used wire cutters to cut off stems from the bunch and cut down some stems shorter to fit the size of the wreath. With a grapevine wreath I can secure most of them by intertwining the faux stems into the grapevine but some of them I had to secure with floral wire and/or hot glue. This Fall wreath only took me about 10 minutes from start to finish! I love the colors and size of this wreath and I will be gifting this to a friend who has wanted a new Fall wreath!


If you are making a wreath with the quilting ring or metal ring, you will definitely need some floral wire, floral tape and some hot glue. If using faux pine for a holiday wreath, I like to use hot glue to glue most of the things onto it. If using a basket, you will most likely need some floral foam to put into the basket.
It is so satisfying to know that you could make a $6 wreath by using all thrifted items to recreate a $150 wreath! Use your imagination and see what you can recreate! Here are some DIY thrifted wreaths I have made over the years using strictly items that have been found at the thrift store.

Have a safe and happy holiday season! Happy thrifting, friends!
-Erin